OpenClaw Installation and Configuration
OpenClaw 是一个面向 AI Agent 与 Computer Use(计算机操作智能体) 场景的开源项目,旨在让大模型从传统的“文本理解与生成”能力,进一步发展为具备“界面感知、任务规划与操作执行”能力的智能体系统。通过结合视觉理解、自然语言推理以及对浏览器或桌面环境的动作控制,OpenClaw 使模型能够围绕用户目标完成一系列实际任务,例如信息检索、网页操作、表单填写、流程执行与界面交互等。
下面以 OpenClaw v2026.3.13 版本为例, 介绍其在 WSL2/Debian 系统中的安装配置过程
1. 前置条件/Prerequisite
1.1. 安装基础工具集
WSL2/Debian 为例:
sudo apt-get install build-essential procps curl file git
OpenClaw 安装及 Skill 安装依赖 git
1.2. 安装 Node.js - OpenClaw 运行环境
Debian/nvm 为例, 其他环境请参考: https://nodejs.org/en/download
curl -o- https://raw.githubusercontent.com/nvm-sh/nvm/v0.40.4/install.sh | bash
\. "$HOME/.nvm/nvm.sh"
nvm install 24
OpenClaw 依赖的 node 版本是 22.12.0+, 如果没有版本选择倾向, 可以让 OpenClaw 安装脚本自动安装
1.3. 安装 Homebrew - 某些 Skill 安装需要
参考: https://brew.sh/, https://docs.brew.sh/Homebrew-on-Linux
/bin/bash -c "$(curl -fsSL https://raw.githubusercontent.com/Homebrew/install/HEAD/install.sh)"
安装结束时按照提示添加 brew 到 PATH:
echo >> /home/zhangsan/.bashrc
echo 'eval "$(/home/linuxbrew/.linuxbrew/bin/brew shellenv bash)"' >> /home/zhangsan/.bashrc
eval "$(/home/linuxbrew/.linuxbrew/bin/brew shellenv bash)"
1.4. 安装 golang shell - 某些 Skill 安装需要
rm -rf /usr/local/go && tar -C /usr/local -xzf go1.26.1.linux-amd64.tar.gz
export PATH=$PATH:/usr/local/go/bin
参考: https://go.dev/doc/install
2. 安装过程中的主要配置
OpenClaw 提供了多种安装方式, 比如可以通过npm i -g openclaw的方式安装, 或Hackable的源码方式安装等. 这里选择最方便的one-liner安装方式, 直接在 linux shell 环境启动安装:
curl -fsSL https://openclaw.ai/install.sh | bash
2.1. Step by step 的介绍
- 启安装后会先检测并安装基础的软件环境, 然后进入配置向导. 首先是一个风险提示, 想安装就输入 y 或 yes
◆  I understand this is personal-by-default and shared/multi-user use requires lock-down. Continue?
│  ● Yes / ○ No
- 配置方式, 可以选择 QuickStart, 后期通过
openclaw configure再配置其它, 或通过openclaw onboard重启配置向导. 这里选择 Manual (通过上下方向键移动选中项后回车)
注: 选择 Manual 的目的是把相关配置一次性配置完. 后续的这些步骤是没有次序和依赖关系的, 都可以先选择 Skip for now 或 Finished 跳过向导后再次启动配置, 设置步骤编号只是为了读起来有次序感.
◆  Onboarding mode
│  ○ QuickStart
│  ● Manual (Configure port, network, Tailscale, and auth options.)
- 选择 Local gateway 在本地安装 gateway, 而不是连接到其它 gateway
◆  What do you want to set up?
│  ● Local gateway (this machine) (No gateway detected (ws://127.0.0.1:18789))
│  ○ Remote gateway (info-only)
- 设定工作目录, 没有特殊要求用默认值即可
◆  Workspace directory
│  /home/zhangsan/.openclaw/workspace
- 配置模型提供者
- 这里有必要说明一下模型的选择, 如果你是想试玩一下 OpenClaw, 感受一下其能力, 但又没有购买 token 包, 可以暂时先选择
Qwen (OAuth), 可以很方便的打开浏览器完成邮箱认证获取小部分免费额度并可投入使用一小会儿, 不过聊几个回合就会把免费额度用完了, 仅够体验- 还有另一个获取免费 token 的渠道就是 nVidia, 登录 build.nvidia.com/models 并使用手机号注册(可能要海外手机号), 可以获得
Up to 40 rpm的 API 调用额度, 在平台上可以免费使用标记为 Free Endpoint 的模型. 比如qwen/qwen3.5-122b-a10b,moonshotai/kimi-k2.5等都可以使用. 注意 OpenClaw 中需要选择的 provider 是Custom Provider- 其它非在列的第三方 API 厂商都选择
Custom Provider, 指定Base URL和API key后, 再根据 API 类型设置是OpenAI-compatible还是Anthropic-compatible, 如果是openai-responses类型的API, 则需要直接修改配置文件openclaw.json- 也可以选择
Skip for now, 稍后通过openclaw configure重新启动配置
◆  Model/auth provider
│  ○ OpenAI
│  ○ Anthropic
│  ○ Chutes
│  ○ MiniMax
│  ○ Moonshot AI (Kimi K2.5)
│  ○ Google
│  ○ xAI (Grok)
│  ○ Mistral AI
│  ○ Volcano Engine
│  ○ BytePlus
│  ○ OpenRouter
│  ○ Kilo Gateway
│  ● Qwen (OAuth)
│  ○ Z.AI
│  ○ Qianfan
│  ○ Alibaba Cloud Model Studio
│  ○ Copilot
│  ○ Vercel AI Gateway
│  ○ OpenCode
│  ○ Xiaomi
│  ○ Synthetic
│  ○ Together AI
│  ○ Hugging Face
│  ○ Venice AI
│  ○ LiteLLM
│  ○ Cloudflare AI Gateway
│  ○ Custom Provider
│  ○ Ollama
│  ○ SGLang
│  ○ vLLM
│  ○ Skip for now
这是选择Qwen (OAuth)后出现的配置步骤, 根据提示的链接完成认证即可:
◒  Starting Qwen OAuth…│
◇  Qwen OAuth ─────────────────────────────────────────────────────────────────────────╮
│                                                                                      │
│  Open https://chat.qwen.ai/authorize?user_code=XXXXXXXX&client=qwen-code to approve  │
│  access.                                                                             │
│  If prompted, enter the code XXXXXXXX.                                               │
│                                                                                      │
├──────────────────────────────────────────────────────────────────────────────────────╯
◐  Waiting for Qwen OAuth approval….

◇  Qwen OAuth complete
│
◇  Provider notes ──────────────────────────────────────────────────────────────────────╮
│                                                                                       │
│  Qwen OAuth tokens auto-refresh. Re-run login if refresh fails or access is revoked.  │
│  Base URL defaults to https://portal.qwen.ai/v1. Override                             │
│  models.providers.qwen-portal.baseUrl if needed.                                      │
│                                                                                       │
├───────────────────────────────────────────────────────────────────────────────────────╯
│
◇  Model configured ─────────────────────────────╮
│                                                │
│  Default model set to qwen-portal/coder-model  │
│                                                │
├────────────────────────────────────────────────╯
│
◆  Default model
│  ○ Keep current (qwen-portal/coder-model)
│  ○ Enter model manually
│  ○ qwen-portal/coder-model
│  ● qwen-portal/vision-model (Qwen Vision · ctx 125k)
- 设定网关端口, 默认即可
◆  Gateway port
│  18789
- 设定网关服务绑定的 IP, 如果需要向外部提供服务, 可选择
LAN (0.0.0.0), 体验推荐Loopback (127.0.0.1)
◆  Gateway bind
│  ● Loopback (127.0.0.1)
│  ○ LAN (0.0.0.0)
│  ○ Tailnet (Tailscale IP)
│  ○ Auto (Loopback → LAN)
│  ○ Custom IP
- 连接网关的认证方式, Token 即可
◆  Gateway auth
│  ● Token (Recommended default (local + remote))
│  ○ Password
- 这一步是设定是否通过 Tailscale 服务把网关端口暴露到公网, 强烈建议 Off, 除非你了解并愿意承担其风险
◆  Tailscale exposure
│  ● Off (No Tailscale exposure)
│  ○ Serve
│  ○ Funnel
- 设置 Gateway token 的保存方式. 测试环境用第一项; 生产环境用 SecretRef, 防止 openclaw.json 文件中存储明文 token
◆  How do you want to provide the gateway token?
│  ● Generate/store plaintext token (Default)
│  ○ Use SecretRef
- 让你选择使用指定的 token (粘贴已有的token), 或自动生成一个 token (保持空白后回车)
◆  Gateway token (blank to generate)
│  Needed for multi-machine or non-loopback access
- 是否现在配置 Channel? Yes
◆  Configure chat channels now?
│  ● Yes / ○ No
Channel 的作用是让你设置可以通过哪个社交软件(聊天工具)来给 OpenClaw 发指令并获取交互输出
- 这里我们选择在国内比较方便配置的飞书
在 OpenClaw v2026.3.13 版本中, 飞书插件安装有一个小坑需要注意一下: 如果 openclaw 安装时使用的是 one-liner 安装, 安装飞书插件那里一定选择
Use local plugin path, 不要再从 npm 库下载一个, 否则后面一直会有一个令人讨厌的 Warning 跟着你:Config warnings:\n- plugins.entries.feishu: plugin feishu: duplicate plugin id detected; later plugin may be overridden (/home/zhangsan/.openclaw/extensions/feishu/index.ts)
◆  Select a channel
│  ○ Telegram (Bot API)
│  ○ WhatsApp (QR link)
│  ○ Discord (Bot API)
│  ○ IRC (Server + Nick)
│  ○ Google Chat (Chat API)
│  ○ Slack (Socket Mode)
│  ○ Signal (signal-cli)
│  ○ iMessage (imsg)
│  ○ LINE (Messaging API)
│  ● Feishu/Lark (飞书) (plugin · install)
│  ○ Nostr (NIP-04 DMs)
│  ○ Microsoft Teams (Bot Framework)
│  ○ Mattermost (plugin)
│  ○ Nextcloud Talk (self-hosted)
│  ○ Matrix (plugin)
│  ○ BlueBubbles (macOS app)
│  ○ Zalo (Bot API)
│  ○ Zalo (Personal Account)
│  ○ Synology Chat (Webhook)
│  ○ Tlon (Urbit)
│  ○ Finished
│
◆ Install Feishu plugin?
│ ○ Download from npm (@openclaw/feishu)
│ ● Use local plugin path (/home/zhangsan/.nvm/versions/node/v24.14.0/lib/node_modules/openclaw/extensions/feishu)
│ ○ Skip for now
12:01:27 [plugins] plugins.allow is empty; discovered non-bundled plugins may auto-load: feishu (/home/zhangsan/.nvm/versions/node/v24.14.0/lib/node_modules/openclaw/extensions/feishu/index.ts). Set plugins.allow to explicit trusted ids.
注: 据说 OpenClaw 在 2026.3.22 ~ 2026.3.23 版本的更新中,对底层的插件架构和扩展目录进行了大规模重构, 新版本中已经不存有
/home/zhangsan/.nvm/versions/node/v24.14.0/lib/node_modules/openclaw/extensions这样的路径, 所以安装选项也会发生变化, 请自行斟酌
- 开始配置飞书
- 启用飞书 Channel 需要在飞书开放平台创建应用和机器人, 获取 App ID 和 App Secret, 需要注意的是权限设置, 确保可以向机器人私发消息
- 飞书开放平台配置参考文档:
- 除了文档中介绍的权限之外, 还是开通 tenant/租户 级别的这些权限:
contact:contact.base:readonly,contact:contact:access_as_app,contact:contact:readonly,contact:contact:readonly_as_app
获取到 App ID 和 App Secret 后, 跟随配置向导完成如下设置:
- 直接粘贴飞书 App Secret 和 App ID (敏感正式环境可选择 external secret provider)
- 设置连接方式 WebSocket
- 根据所在环境选择飞书域名, 国内为 feishu.cn, 国外为 larksuite.com
- 安全设置, 设置哪些群聊可以使用飞书机器人. 可以通过 Allowlist 来设置群 ID, 或设置为 Open 允许所有群使用. 群聊的会话 ID 可以在飞书群 -> 设置界面的最底部查看
◇  Feishu credentials ──────────────────────────────────────────────────────────────╮
│                                                                                   │
│  1) Go to Feishu Open Platform (open.feishu.cn)                                   │
│  2) Create a self-built app                                                       │
│  3) Get App ID and App Secret from Credentials page                               │
│  4) Enable required permissions: im:message, im:chat, contact:user.base:readonly  │
│  5) Publish the app or add it to a test group                                     │
│  Tip: you can also set FEISHU_APP_ID / FEISHU_APP_SECRET env vars.                │
│  Docs: feishu                 │
│                                                                                   │
├───────────────────────────────────────────────────────────────────────────────────╯
│
◆  How do you want to provide this App Secret?
│  ● Enter App Secret (Stores the credential directly in OpenClaw config)
│  ○ Use external secret provider

◇  Enter Feishu App Secret
│  XXXXXXXXXXXXXXXXXXXXXXXXXXXXXXXX
│
◇  Enter Feishu App ID
│  cli_xxxxxxxxxxxxxxxx
[info]: [ 'client ready' ]
│
◇  Feishu connection test ───────────────────────────╮
│                                                    │
│  Connected as ou_xxxxxxxxxxxxxxxxxxxxxxxxxxxxxxxx  │
│                                                    │
├────────────────────────────────────────────────────╯
│
◆  Feishu connection mode
│  ● WebSocket (default)
│  ○ Webhook

◆  Which Feishu domain?
│  ● Feishu (feishu.cn) - China
│  ○ Lark (larksuite.com) - International

◆  Group chat policy
│  ● Allowlist - only respond in specific groups
│  ○ Open - respond in all groups (requires mention)
│  ○ Disabled - don't respond in groups
│
◆  Group chat allowlist (chat_ids)
│  oc_xxxxx, oc_yyyyy
飞书配置完成后如果不再配置其他 Channel, 就在 Channel 配置界面选择 Finished 继续.
- 接下来向导会问你是否要配置私聊(Direct Message, DM)访问策略: Yes 无疑
◆  Configure DM access policies now? (default: pairing)
│  ● Yes / ○ No
- 设置飞书私聊策略, 对应的选择分别是: 一一配对, 白名单, 全开放
如果选择一一配对, 某个用户给机器人私发消息时会弹出配对指令, 通过 openclaw 执行该指令授权后才会有响应:
openclaw pairing approve feishu <CODE>
◆  Feishu DM policy
│  ● Pairing (recommended)
│  ○ Allowlist (specific users only)
│  ○ Open (public inbound DMs)
│  ○ Disabled (ignore DMs)
- 为 openclaw 配置联网搜索功能, 这也是一个必要的基本能力
个人使用的话, 推荐可以免费薅羊毛的 Brave Search, 方法也比较简单:
- 注册登录brave search api 平台: https://brave.com/search/api/
- 在 Billing -> Payment method 中绑定一个卡, 支持银联, 绑定后会预扣一个美金
- 在 Usage limits 中可以设置每月使用限额, 设置为 5 美金. Brave Search 会每月赠送你 5 美金的额度. 这样就互抵了, 免费使用
- 进入
API keys, 点击Add API key, 创建一下 key 并复制, 选中Brave Search并在接下来的步骤填入复制的 key, Brave Search 就配置完成了
◆  Search provider
│  ● Brave Search (Structured results · country/language/time filters)
│  ○ Gemini (Google Search)
│  ○ Grok (xAI)
│  ○ Kimi (Moonshot)
│  ○ Perplexity Search
│  ○ Skip for now

◇  Brave Search API key
│  BSAxxxxxx_XXXXXXXXX_xxxxxxxxxxx
- Skill 配置步骤, 暂不需要什么高级功能, 可以选择跳过, 相应 Skill 需要的 KEY 也全部选 No, 如需要可以后期再配置
◇  Skills status ─────────────╮
│                             │
│  Eligible: 18               │
│  Missing requirements: 31   │
│  Unsupported on this OS: 7  │
│  Blocked by allowlist: 0    │
│                             │
├─────────────────────────────╯
│
◆  Configure skills now? (recommended)
│  ○ Yes / ● No

◇  Set GOOGLE_PLACES_API_KEY for goplaces?
│  No
│
◇  Set GEMINI_API_KEY for nano-banana-pro?
│  No
│
◇  Set NOTION_API_KEY for notion?
│  No
│
◇  Set OPENAI_API_KEY for openai-image-gen?
│  No
│
◇  Set OPENAI_API_KEY for openai-whisper-api?
│  No
│
◆  Set ELEVENLABS_API_KEY for sag?
│  ○ Yes / ● No
- Hooks 建议启用 command-logger 和 session-memory, 主要用于实现命令日志记录和会话记忆功能
复选框的选择方式是: 方向键移动到高亮选项, 然后通过空格键选中或取消选中
◆  Enable hooks?
│  ◻ Skip for now
│  ◻ 🚀 boot-md
│  ◻ 📎 bootstrap-extra-files
│  ◼ 📝 command-logger (Log all command events to a centralized audit file)
│  ◼ 💾 session-memory (Save session context to memory when /new or /reset command is issued)
- 是否在 Service 形式安装 gateway: Yes, 安装后可以像管理普通 systemd 服务的形式进行管理, 比如通过
systemctl --user status openclaw-gateway来查询状态
◆  Install Gateway service (recommended)
│  ● Yes / ○ No
- 完成安装
- 接下来根据向导完成安装就行了
- 需要记录下 Gateway 的 token, 可以直接点击 Web UI 链接打开 OpenClaw Web UI
- 最后的
bash shell completion for openclaw可以根据个人习惯选择装或不装, 没啥大用, 就那几个命令
◆  Gateway service runtime
│  ● Node (recommended) (Required for WhatsApp + Telegram. Bun can corrupt memory on reconnect.)

◒  Installing Gateway service…
Installed systemd service: /home/zhangsan/.config/systemd/user/openclaw-gateway.service
◇  Gateway service installed.
│
◇
Health check failed: gateway closed (1006 abnormal closure (no close frame)): no close reason
  Gateway target: ws://127.0.0.1:18789
  Source: local loopback
  Config: /home/zhangsan/.openclaw/openclaw.json
  Bind: lan
│
◇  Health check help ────────────────────────────────╮
│                                                    │
│  Docs:                                             │
│  https://docs.openclaw.ai/gateway/health           │
│  https://docs.openclaw.ai/gateway/troubleshooting  │
│                                                    │
├────────────────────────────────────────────────────╯
│
◇  Optional apps ────────────────────────╮
│                                        │
│  Add nodes for extra features:         │
│  - macOS app (system + notifications)  │
│  - iOS app (camera/canvas)             │
│  - Android app (camera/canvas)         │
│                                        │
├────────────────────────────────────────╯
│
◇  Control UI ───────────────────────────────────────────────────────────────────────╮
│                                                                                    │
│  Web UI: http://127.0.0.1:18789/                                                 │
│  Web UI (with token):                                                              │
│  http://127.0.0.1:18789/#token=25637d07f8f36fe427c6de1d9f2214fc564f2be49809359d  │
│  Gateway WS: ws://127.0.0.1:18789                                                │
│  Gateway: not detected (SECURITY ERROR: Gateway URL "ws://127.0.0.1:18789" uses  │
│  plaintext ws:// to a non-loopback address.)                                       │
│  Docs: https://docs.openclaw.ai/web/control-ui                                     │
│                                                                                    │
├────────────────────────────────────────────────────────────────────────────────────╯
│
◇  Workspace backup ────────────────────────────────────────╮
│                                                           │
│  Back up your agent workspace.                            │
│  Docs: https://docs.openclaw.ai/concepts/agent-workspace  │
│                                                           │
├───────────────────────────────────────────────────────────╯
│
◇  Security ──────────────────────────────────────────────────────╮
│                                                                 │
│  Running agents on your computer is risky — harden your setup:  │
│  https://docs.openclaw.ai/security                              │
│                                                                 │
├─────────────────────────────────────────────────────────────────╯
│
◆  Enable bash shell completion for openclaw?
│  ● Yes / ○ No
2.2. 配置文件
除了一些凭证或 token 信息, OpenClaw 的配置内容都保存在 .openclaw/openclaw.json 文件中, 如果你对该文件结构足够熟悉, 可以直接修改该文件, 然后执行openclaw daemon restart重启生效即可.
下面是一个配置文件示例:
{
"meta": {
"lastTouchedVersion": "2026.3.23-2",
"lastTouchedAt": "2026-03-25T07:13:31.449Z"
},
"wizard": {
"lastRunAt": "2026-03-25T07:13:31.416Z",
"lastRunVersion": "2026.3.23-2",
"lastRunCommand": "onboard",
"lastRunMode": "local"
},
"auth": {
"profiles": {
"qwen-portal:default": {
"provider": "qwen-portal",
"mode": "oauth"
},
"ollama:default": {
"provider": "ollama",
"mode": "api_key"
}
}
},
"models": {
"mode": "merge",
"providers": {
"mycompany-openai": {
"baseUrl": "https://ai.mycompany.com/openai/v1",
"apiKey": "sk-xxxxxxxxxxxxxxxxxxxxxxxxxxxx",
"api": "openai-responses",
"models": [
{
"id": "gpt-5.3-chat",
"name": "gpt-5.3-chat (Custom Provider)",
"reasoning": true,
"input": [
"text",
"image"
],
"cost": {
"input": 0,
"output": 0,
"cacheRead": 0,
"cacheWrite": 0
},
"contextWindow": 100000,
"maxTokens": 16000
},
{
"id": "gpt-5.4",
"name": "gpt-5.4 (Custom Provider)",
"reasoning": true,
"input": [
"text",
"image"
],
"cost": {
"input": 0,
"output": 0,
"cacheRead": 0,
"cacheWrite": 0
},
"contextWindow": 1000000,
"maxTokens": 128000
}
]
},
"mycompany-anthropic": {
"baseUrl": "https://ai.mycompany.com/v1",
"apiKey": "sk-xxxxxxxxxxxxxxxxxxxxxxx",
"api": "anthropic-messages",
"models": [
{
"id": "claude-haiku-4-5",
"name": "claude-haiku-4-5 (Custom Provider)",
"reasoning": true,
"input": [
"text",
"image"
],
"cost": {
"input": 0,
"output": 0,
"cacheRead": 0,
"cacheWrite": 0
},
"contextWindow": 200000,
"maxTokens": 64000
},
{
"id": "claude-sonnet-4-6",
"name": "claude-sonnet-4-6 (Custom Provider)",
"reasoning": true,
"input": [
"text",
"image"
],
"cost": {
"input": 0,
"output": 0,
"cacheRead": 0,
"cacheWrite": 0
},
"contextWindow": 1000000,
"maxTokens": 64000
},
{
"id": "claude-opus-4-6",
"name": "claude-opus-4-6 (Custom Provider)",
"reasoning": true,
"input": [
"text",
"image"
],
"cost": {
"input": 0,
"output": 0,
"cacheRead": 0,
"cacheWrite": 0
},
"contextWindow": 1000000,
"maxTokens": 128000
}
]
},
"mycompany-google": {
"baseUrl": "https://ai.mycompany.com/v1",
"apiKey": "sk-xxxxxxxxxxxxxxxxxxxxxxx",
"api": "google-generative-ai",
"models": [
{
"id": "gemini-3.1-flash-lite",
"name": "gemini-3.1-flash-lite (Custom Provider)",
"reasoning": true,
"input": [
"text",
"image"
],
"cost": {
"input": 0,
"output": 0,
"cacheRead": 0,
"cacheWrite": 0
},
"contextWindow": 1000000,
"maxTokens": 65000
},
{
"id": "gemini-3.1-pro",
"name": "gemini-3.1-pro (Custom Provider)",
"reasoning": true,
"input": [
"text",
"image"
],
"cost": {
"input": 0,
"output": 0,
"cacheRead": 0,
"cacheWrite": 0
},
"contextWindow": 1000000,
"maxTokens": 65000
}
]
},
"ollama": {
"baseUrl": "http://127.0.0.1:11434",
"apiKey": "OLLAMA_API_KEY",
"api": "ollama",
"models": [
{
"id": "glm-4.7-flash",
"name": "glm-4.7-flash",
"reasoning": false,
"input": [
"text"
],
"cost": {
"input": 0,
"output": 0,
"cacheRead": 0,
"cacheWrite": 0
},
"contextWindow": 128000,
"maxTokens": 8192
},
{
"id": "qwen3-embedding:4b",
"name": "qwen3-embedding:4b",
"reasoning": false,
"input": [
"text"
],
"cost": {
"input": 0,
"output": 0,
"cacheRead": 0,
"cacheWrite": 0
},
"contextWindow": 40960,
"maxTokens": 8192
},
{
"id": "qwen3.5:2b",
"name": "qwen3.5:2b",
"reasoning": false,
"input": [
"text"
],
"cost": {
"input": 0,
"output": 0,
"cacheRead": 0,
"cacheWrite": 0
},
"contextWindow": 262144,
"maxTokens": 8192
},
{
"id": "qwen2.5:3b",
"name": "qwen2.5:3b",
"reasoning": false,
"input": [
"text"
],
"cost": {
"input": 0,
"output": 0,
"cacheRead": 0,
"cacheWrite": 0
},
"contextWindow": 32768,
"maxTokens": 8192
},
{
"id": "nomic-embed-text:latest",
"name": "nomic-embed-text:latest",
"reasoning": false,
"input": [
"text"
],
"cost": {
"input": 0,
"output": 0,
"cacheRead": 0,
"cacheWrite": 0
},
"contextWindow": 2048,
"maxTokens": 8192
},
{
"id": "qwen3.5:4b",
"name": "qwen3.5:4b",
"reasoning": false,
"input": [
"text"
],
"cost": {
"input": 0,
"output": 0,
"cacheRead": 0,
"cacheWrite": 0
},
"contextWindow": 262144,
"maxTokens": 8192
},
{
"id": "qwen3:4b",
"name": "qwen3:4b",
"reasoning": false,
"input": [
"text"
],
"cost": {
"input": 0,
"output": 0,
"cacheRead": 0,
"cacheWrite": 0
},
"contextWindow": 262144,
"maxTokens": 8192
},
{
"id": "qwen3:8b",
"name": "qwen3:8b",
"reasoning": false,
"input": [
"text"
],
"cost": {
"input": 0,
"output": 0,
"cacheRead": 0,
"cacheWrite": 0
},
"contextWindow": 40960,
"maxTokens": 8192
}
]
},
"nvidia-nim": {
"baseUrl": "https://integrate.api.nvidia.com/v1",
"apiKey": "nvapi-xxxxxxxxxxxxxxxxxxxxxxxxxxxxxxxxxxxxx",
"api": "openai-completions",
"models": [
{
"id": "moonshotai/kimi-k2.5",
"name": "moonshotai/kimi-k2.5 (Custom Provider)",
"api": "openai-completions",
"reasoning": false,
"input": [
"text"
],
"cost": {
"input": 0,
"output": 0,
"cacheRead": 0,
"cacheWrite": 0
},
"contextWindow": 16000,
"maxTokens": 4096
},
{
"id": "qwen/qwen3.5-397b-a17b",
"name": "qwen/qwen3.5-397b-a17b (Custom Provider)",
"reasoning": true,
"input": [
"text"
],
"cost": {
"input": 0,
"output": 0,
"cacheRead": 0,
"cacheWrite": 0
},
"contextWindow": 16000,
"maxTokens": 4096
},
{
"id": "qwen/qwen3-5-122b-a10b",
"name": "qwen / qwen3-5-122b-a10b (Custom Provider)",
"reasoning": true,
"input": [
"text"
],
"cost": {
"input": 0,
"output": 0,
"cacheRead": 0,
"cacheWrite": 0
},
"contextWindow": 16384,
"maxTokens": 4096
}
]
}
}
},
"agents": {
"defaults": {
"model": {
"primary": "mycompany-anthropic/claude-sonnet-4-6",
"fallbacks": [
"mycompany-anthropic/claude-haiku-4-5",
"mycompany-openai/gpt-5.3-chat",
"mycompany-anthropic/claude-opus-4-6",
"mycompany-google/gemini-3.1-pro",
"mycompany-google/gemini-3.1-flash-lite",
"mycompany-openai/gpt-5.4",
"nvidia-nim/qwen/qwen3.5-122b-a10b",
"nvidia-nim/qwen/qwen3.5-397b-a17b",
"nvidia-nim/moonshotai/kimi-k2.5",
"ollama/qwen3:4b",
"ollama/qwen3.5:4b",
"ollama/qwen3.5:2b",
"ollama/qwen3:8b",
"ollama/qwen2.5:3b"
]
},
"models": {
"ollama/qwen3:4b": {},
"ollama/qwen3.5:4b": {},
"ollama/qwen3.5:2b": {},
"ollama/qwen3:8b": {},
"ollama/qwen2.5:3b": {},
"nvidia-nim/moonshotai/kimi-k2.5": {},
"nvidia-nim/qwen/qwen3.5-397b-a17b": {},
"nvidia-nim/qwen/qwen3.5-122b-a10b": {},
"mycompany-openai/gpt-5.4": {},
"mycompany-openai/gpt-5.3-chat": {},
"mycompany-anthropic/claude-opus-4-6": {},
"mycompany-anthropic/claude-haiku-4-5": {},
"mycompany-anthropic/claude-sonnet-4-6": {},
"mycompany-google/gemini-3.1-flash-lite": {},
"mycompany-google/gemini-3.1-pro": {}
},
"workspace": "/home/zhangsan/.openclaw/workspace",
"memorySearch": {
"enabled": true,
"provider": "ollama",
"remote": {
"baseUrl": "http://127.0.0.1:11434",
"apiKey": "ollama"
},
"model": "nomic-embed-text"
}
},
"list": [
{
"id": "main",
"model": "mycompany-openai/gpt-5.4"
}
]
},
"tools": {
"profile": "full",
"web": {
"search": {
"enabled": true,
"provider": "brave"
}
}
},
"commands": {
"native": "auto",
"nativeSkills": "auto",
"restart": true,
"ownerDisplay": "raw"
},
"session": {
"dmScope": "per-channel-peer"
},
"hooks": {
"internal": {
"enabled": true,
"entries": {
"command-logger": {
"enabled": true
},
"session-memory": {
"enabled": true
}
}
}
},
"channels": {
"feishu": {
"enabled": true,
"appId": "cli_xxxxxxxxxxxxxxxx",
"appSecret": "xxxxxxxxxxxxxxxxxxxxxxxxxxxxxxxx",
"connectionMode": "websocket",
"domain": "feishu",
"groupPolicy": "allowlist",
"groupAllowFrom": [
"oc_xxxxxxxxxxxxxxxxxxxxxxxxxxxxxxxx"
]
}
},
"gateway": {
"port": 18789,
"mode": "local",
"bind": "lan",
"controlUi": {
"allowedOrigins": [
"http://localhost:18789",
"http://127.0.0.1:18789"
]
},
"auth": {
"mode": "token",
"token": "xxxxxxxxxxxxxxxxxxxxxxxxxxxxxxxxxxxxxxxxxxxxxxxx"
},
"tailscale": {
"mode": "off",
"resetOnExit": false
},
"nodes": {
"denyCommands": [
"camera.snap",
"camera.clip",
"screen.record",
"contacts.add",
"calendar.add",
"reminders.add",
"sms.send"
]
}
},
"plugins": {
"allow": [
"feishu",
"qwen-portal-auth",
"brave"
],
"load": {
"paths": []
},
"entries": {
"qwen-portal-auth": {
"enabled": true
},
"feishu": {
"enabled": true
},
"brave": {
"enabled": true,
"config": {
"webSearch": {
"apiKey": "BSAxxxxxx_xxxxxxxxx_xxxxxxxxxxx"
}
}
}
}
}
}
3. 自定义模型 Provider 及 API 兼容模式
OpenClaw 安装完成后, 可以通过openclaw configure命令重新启动配置向导. 如果你有购买第三方的模型服务 API, 或公司内部有统一付费的模型 API 代理, 可以通过Custom Provider途径对接.
3.1 向导配置说明
启动配置向导后的选择路径: Where will the Gateway run?: Local -> Select sections to configure: Model -> Model/auth provider: Custom Provider
以 https://build.nvidia.com/moonshotai/kimi-k2.5 模型为例, 在向导中分别提供:
- API Base URL
API Base URL
│  https://integrate.api.nvidia.com/v1
- 粘贴获取的 API key
How do you want to provide this API key?
│  ● Paste API key now (Stores the key directly in OpenClaw config)

API Key (leave blank if not required)
nvapi-**********U9w
- 选择 API 兼容类型
在 OpenClaw(以及类似的 LLM 网关/代理框架)中,模型 API 兼容模式(Compatibility Modes) 的核心作用是协议转换。市面上的大语言模型(LLM)厂商并没有统一的标准,各家的接口参数、消息格式、甚至返回值结构都不一样。这些“模式”就是告诉框架:应该用什么格式把你的 Prompt 组装发给大模型,以及怎么解析大模型吐回来的数据。特别是 OpenClaw 还涉及到工具的调用, 协议不匹配会直接导致 OpenClaw 报错, 比如常见的
Message ordering conflict - please try again. If this persists, use /new to start a fresh session.错误就是因为协议不匹配引起的.
OpenClaw 配置向导提供了两种 API 兼容模式, 对于更多的模型厂商, 可以直接去修改 openclaw.json 文件以获得更好的兼容性和功能扩展
 Endpoint compatibility
│  ● OpenAI-compatible (Uses /chat/completions)
│  ○ Anthropic-compatible
│  ○ Unknown (detect automatically)
-
选择模型 Model ID moonshotai/kimi-k2.5
-
给 Provider 取个名称 Endpoint ID nvidia-nim
-
Model alias 没有意义, 留空回车完成模型配置
3.2 API 兼容模式对比
参考上文提供的 openclaw.json 的示例, API 兼容模式配置在 models.providers.<YOUR PROVIDER>.api 属性中, 下表收集了常见的 API 兼容模式, 请根据选用的 provider 和 模型去配置正确的模式:
| 模式名称 (API Mode) | 适用模型 / 生态 | 底层 API 特点 & 工作原理 | 当前状态 / 适用场景 |
|---|---|---|---|
openai-responses (或 openai-chat) | 现代 GPT 家族 (GPT-4o) 90% 第三方模型 (DeepSeek, 阿里, Kimi 等) | 当前行业绝对的“事实标准”。 采用标准的 messages 数组(区分 System/User/Assistant/Tool 角色),原生完美支持函数调用 (Function Calling)。 | 🌟 绝对主流 / 核心必选 只要不是 Claude 或 Google 亲儿子,无脑选此模式。 |
openai-completions | 早期 GPT 模型 (davinci) 代码补全专用模型 | 大模型时代的“活化石”。 不支持角色划分,单向纯文本输入 ( prompt),模型只负责单向文本接龙(续写)。 | ⚠️ 逐步淘汰 / 特定场景 仅在代码行级补全 (Copilot) 或旧模型兼容时使用。 |
anthropic-messages | 现代 Claude 3 / 3.5 家族 (Haiku, Sonnet, Opus) | Anthropic 全新设计的现代协议。 强制 System 提示词与对话历史分离(置于顶层),拥有极其严谨的多模态和工具调用数据结构。 | 🔥 复杂任务首选 在代码生成、长文本理解和复杂 Agent 工作流中表现极佳。 |
anthropic-completion | 早期 Claude 1 / 2 家族 | 无结构化数组时代的妥协产物。 依赖在纯文本中硬编码 \n\nHuman: 和 \n\nAssistant: 换行符来模拟多轮对话身份。 | ❌ 已废弃 (Deprecated) 仅用于极少数遗留的老旧系统兼容。 |
google-ai (或 google-generative-ai) | 个人版 Gemini 家族 (Gemini 1.5 Pro / Flash 等) | Google AI Studio 开发者通道。 完全无视 OpenAI 标准,自创 contents/parts 嵌套结构;使用简单的 API Key 即可进行鉴权调用。 | 🚀 个人开发者 / 轻量级首选 适合中小团队直接对接性价比极高的 Gemini 模型。 |
google-gemini (或 vertex-ai) | 企业版 Gemini 家族 (依托于 Google Cloud) | Google Cloud (GCP) 企业级通道。 数据结构同上,但网络路由和鉴权完全不同。需配置 GCP 的项目 ID、部署区域 (Region) 以及 IAM 复杂凭据。 | 🏢 企业级云服务 / 合规必备 适合对数据隐私、SLA 保证有严格要求的出海企业。 |
azure-openai | 微软云 GPT 家族 (依托于 Microsoft Azure) | 数据结构 100% 同 OpenAI 标准。 但网络层被微软魔改:强制使用 api-key 请求头,URL 必须拼接专有的部署名和 api-version 版本号。 | 🛡️ 世界500强 / 隐私合规标配 享受微软企业级数据不泄露协议 (B2B SLA) 的唯一途径。 |
ollama | 本地开源模型 (Llama 3, Qwen2, Mistral 等) | 本地私有化部署原生 API。 不走云端,直接与本地 Ollama 引擎通信,支持 keep_alive(模型常驻内存)等精细化的硬件调度参数。 | 💻 本地优先 / 隐私极客必备 零 API 成本,适合让 Agent 离线操作本地电脑和敏感文件。 |
4. 配置启用 Memory Search (必要)
在 OpenClaw 这样的大模型 Agent 框架中,如果说前面提到的 session-memory 是机器人的**“短期记忆(RAM 内存)”,那么 Memory Search(记忆搜索) 就是机器人的“长期记忆(硬盘 / 知识库)”**。
Memory Search 的核心作用是跨会话的语义检索与上下文增强(RAG)。它让 AI 能够“记住”几天前、几个月前甚至几年前你们聊过的信息,或者从海量的文档中瞬间找出相关内容。
在 OpenClaw 中,Memory Search 赋予了 Agent 真正的“成长性”和“企业级知识储备”。它让大模型不再是一个每次都需要重新调教的通用工具,而是一个能随着你不断使用、不断积累经验,越来越懂你业务的专属 AI 助手。
Memory Search 并不是像传统数据库那样用 WHERE text LIKE '%关键字%' 去做死板的字面匹配,它使用的是向量检索(Vector Search)。我们需要为 Memory Search 提供一个 Embedding 模型.
4.1. Ollama 配置示例
如果你有一个带显卡的PC, 可以选择部署一个 Ollama 环境, 参见 Ollama 安装
然后下载一个轻量化的 Embedding 模型(比如 nomic-embed-text), 用于开启 Memory Search.
- 下载模型
ollama pull nomic-embed-text
- 配置启用 Memory Search, 假设 Ollama 部署在 OpenClaw 本机:
openclaw config set agents.defaults.memorySearch.enabled true
openclaw config set agents.defaults.memorySearch.provider "ollama"
openclaw config set agents.defaults.memorySearch.remote.baseUrl "http://127.0.0.1:11434"
openclaw config set agents.defaults.memorySearch.remote.apiKey "ollama"
openclaw config set agents.defaults.memorySearch.model "nomic-embed-text"
- 查看并重建 Memory 索引
openclaw memory status --deep # 查看
openclaw memory index # 索引
openclaw memory status --deep # 再查看
当然也可以直接使用厂家的商业 Embedding 模型, 默认方式相同, 请自行选用
5. 解锁命令执行等所有权限
OpenClaw v2026.3.13 版本的 profile 默认是 coding, 不具备命令执行权限, 通过把 profile 设置为 full, 以解锁所有权限:
openclaw config set tools.profile full
openclaw gateway restart
6. 使用方式
6.1. 通过 WebChat. 比如: http://127.0.0.1:18789/
6.2. 通过你绑定的 Channel. 比如: 飞书, What's App 等
7. 在 WSL 中基于OpenClaw Browser Relay启用浏览器操作
在 Windows Subsystem for Linux (WSL) 中安装 OpenClaw 没有像在 MacOS 和 Windows 上安装那么方便的操纵浏览器, 但也不是没有办法.
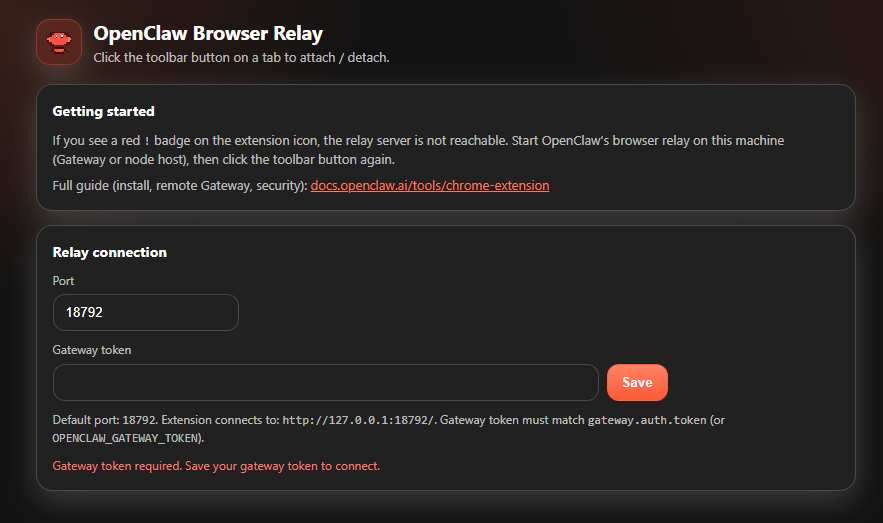
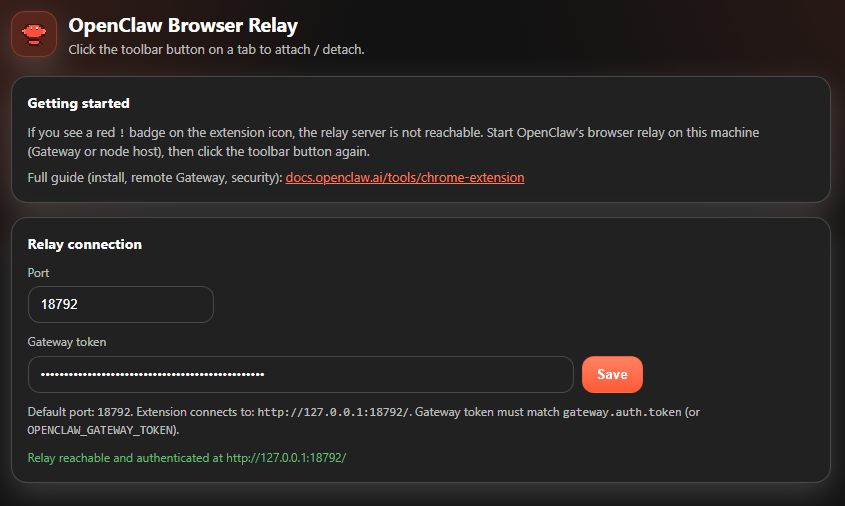
比如通过 Chrome 的插件: OpenClaw Browser Relay, 到这儿来安装: https://chromewebstore.google.com/search/OpenClaw%20Browser%20Relay, 然后设置:
-
安装完成后会弹出设置界面, 默认情况下不用修改端口, 填入 Gateway token 后点击 Save 按钮
-
确保 OpenClaw Browser Relay 插件成功连接到网关:
-
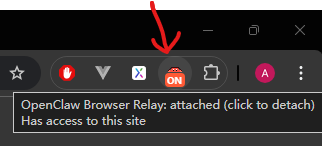
在浏览器中把插件按钮显示出来, 并点击:
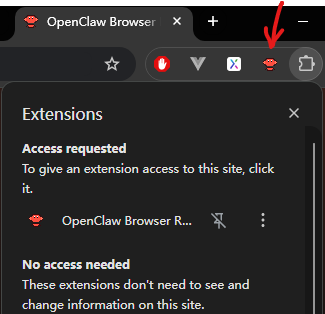
-
当插件的状态变为"ON"的时候, OpenClaw就可以操纵这个浏览器 tab了.
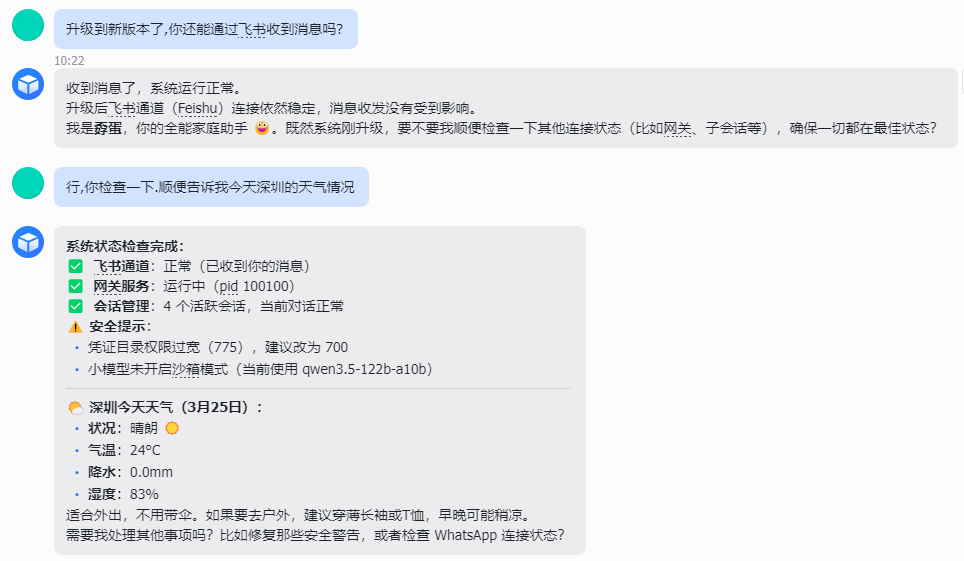
然后就可以通过 WebChat 或 Channel 直接告诉 OpenClaw 帮你填下活了, 比如: 打开某个网址, 进入某个模块, 抓取某些数据, 有异常的话给 Channel 发个告警, 然后再把这几步做下定时巡检任务.
注: OpenClaw Browser Relay 在 v2026.3.13 版本工作正常, 但升级到 v2026.3.23-2 版本后, 浏览器插件连接网关一直连不上, 还在研究. 报错如下:
Relay not reachable/authenticated at http://127.0.0.1:18792/. Start OpenClaw browser relay and verify token.
8. 环境变量的配置
使用 .openclaw 目录下的 .env 文件, 可以直接为 OpenClaw 配置所以的环境变量. 比如:
$ cat ~/.openclaw/.env
HTTP_PROXY=http://127.0.0.1:10808
OPENAI_API_KEY=sk-...
ANTHROPIC_API_KEY=sk-ant-...
FEISHU_APP_SECRET=...
9. 使用 Clawhub 安装 Skill
想持续提供 OpenClaw 的能力吗? 请安装 Skill.
- 去 https://clawhub.ai/skills 找到心仪的 Skill
- 安装 clawhub CLI:
npm i -g clawhub - 使用
clawhub login登录 clawhub, 登录后可以使用clawhub whoami查看登录状态 - 使用
clawhub install <SKILL>安装. 比如:clawhub install weather
10. 升级 OpenClaw
跟安装一样, 重新执行就行了, 然后在配置向导中一路选择保留配置和数据.
12. 卸载 OpenClaw
- 执行如下脚本进行卸载:
openclaw uninstall --all --yes --non-interactive
npm rm -g openclaw
- 如果无法通过上述指令清除干净, 必要情况下通过查找删除所有目录:
$ which openclaw
/home/zhangsan/.npm-global/bin/openclaw

$ cd /home/zhangsan/.npm-global/bin/
$ ls -la
total 8
drwxr-xr-x 2 zhangsan zhangsan 4096 Mar 12 20:26 .
drwxr-xr-x 4 zhangsan zhangsan 4096 Mar 12 20:13 ..
lrwxrwxrwx 1 zhangsan zhangsan   41 Mar 12 20:26 openclaw -> ../lib/node_modules/openclaw/openclaw.mjs

~/.npm-global/bin$ rm openclaw
~/.npm-global/bin$ rm -rf ../lib/node_modules/openclaw
- 修改 ~/.bashrc, 删除 OpenClaw bash completions 相关内容
12. Slash Commands
OpenClaw 的 WebChat 中可以直接执行 bash 指令, 格式是在聊天窗口中直接输入 !<cmd> 或 /bash <cmd>
但默认没有开启, 执行/bash ls -la时会提示: bash is disabled. Set commands.bash=true to enable. Docs: https://docs.openclaw.ai/tools/slash-commands#config
现在展示一步步开启:
openclaw config set commands.bash true
$ openclaw config set commands.bash true

🦞 OpenClaw 2026.3.23-2 (7ffe7e4) — I don't sleep, I just enter low-power mode and dream of clean diffs.

Config overwrite: /home/zhangsan/.openclaw/openclaw.json (sha256 19870f67fda3bf3964d110ac38cfac4e87e1363dbe4dba25fa4fdadd9f91ba63 -> 4e9bb164bd13d959ef161810194e112ad97bd037ec0570b57298555d9b68eeb2, backup=/home/zhangsan/.openclaw/openclaw.json.bak)
Updated commands.bash. Restart the gateway to apply.
再试/bash ls -la提示:
elevated is not available right now (runtime=direct).
Failing gates: allowFrom (tools.elevated.allowFrom.webchat)
Fix-it keys:
- tools.elevated.enabled
- tools.elevated.allowFrom.<provider>
- agents.list[].tools.elevated.enabled
- agents.list[].tools.elevated.allowFrom.<provider>
See: openclaw sandbox explain --session agent:main:main
openclaw sandbox explain --session agent:main:main
$ openclaw sandbox explain --session agent:main:main

🦞 OpenClaw 2026.3.23-2 (7ffe7e4) — Self-hosted, self-updating, self-aware (just kidding... unless?).

Effective sandbox:
  agentId: main
  sessionKey: agent:main:main
  mainSessionKey: agent:main:main
  runtime: direct
  mode: off scope: agent perSession: false
  workspaceAccess: none workspaceRoot: /home/zhangsan/.openclaw/sandboxes

Sandbox tool policy:
  allow (default): exec, process, read, write, edit, apply_patch, image, sessions_list, sessions_history, sessions_send, sessions_spawn, sessions_yield, subagents, session_status
  deny  (default): browser, canvas, nodes, cron, gateway, telegram, whatsapp, discord, irc, googlechat, slack, signal, imessage, line

Elevated:
  enabled: true
  channel: webchat
  allowedByConfig: false
  failing gates: allowFrom (tools.elevated.allowFrom.webchat)

Fix-it:
  - tools.sandbox.tools.allow
  - tools.sandbox.tools.deny
  - agents.list[].tools.sandbox.tools.allow
  - agents.list[].tools.sandbox.tools.deny
  - tools.elevated.enabled
  - tools.elevated.allowFrom.webchat

Docs: docs.openclaw.ai/sandbox
- 根据提示依次执行:
openclaw config set tools.elevated.enabled true
openclaw config set tools.elevated.allowFrom.webchat '["*"]'
openclaw gateway restart
- 再次尝试执行
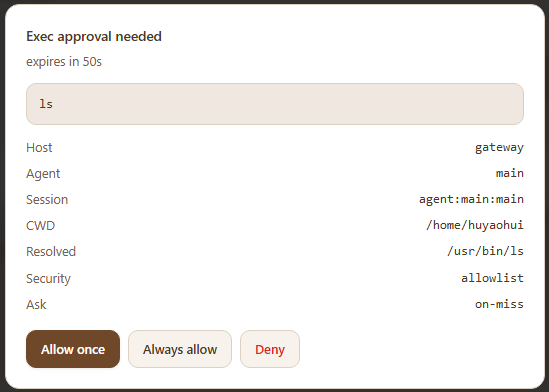
/bash ls -la, 在弹出的窗口 Allow 操作
13. 其它排错调试场景
- 在飞书中向机器人发消息时得到的回复是
OpenClaw: access not configured.
OpenClaw: access not configured.
Your Feishu user id: ou_xxxxxxxxxxxxxxxxxxxxxxxxxxxxxxxx
Pairing code: XXXXXXXX
Ask the bot owner to approve with:
openclaw pairing approve feishu XXXXXXXX
是因为你飞书 Channel 的 DM Policy 是 pairing, 需要 OpenClaw 所有人执行 openclaw pairing approve feishu XXXXXXXX 进行授权, 然后就可以通过飞书指挥 OpenClaw 了\
- 大量的
Tool not found回复 大概率就是你的模型 API 类型配置错误, 请检查 openclaw.json 中的这三个属性值配置是否跟模型匹配:
models.providers.<YOUR PROVIDER>.api- API 兼容模式models.providers.<YOUR PROVIDER>.models[].reasoning- 是否支持开启思考models.providers.<YOUR PROVIDER>.models[].input[]- 是否配置了支持的输入类型. 如 "text", "image" 等
最后祝养虾愉快!!!
